Time of Day
Golden Hour Is Not Just for Landscapes: It is a mantra among-st landscape photographers that the ‘golden hour’ is the best time to make images. It’s not strictly an hour, but the period of time shortly before to shortly after sunrise or sunset is called the ‘golden hour’ or ‘magic hour’ because light is more diffused, the colors are warm and fuzzy and light angles are low. This works for animals too! Get those soft and cuddly animals into warm and fuzzy light and you’ll be feeling warm and fuzzy looking at the scene in your viewfinder.
It is not just the light that should be enticing you out of bed early in the morning. You may get to see late-to-bed nocturnal species in what is a transition time between night and day. In hot climates the cooler evenings and mornings will have predators in particular more active and more likely to be coming in to drink or hunt at sources of water. Early morning is a great time to see African predators on a kill that was made during the night. Lions in particular are quite likely to be seen active instead of doing what they usually do during the heat of the day - sleeping under a tree.
Shooting in the early morning or late evening does present challenges. While the light is lovely the light levels can be very low. You will need to take advantage of the amazing high ISO capabilities that modern DSLR cameras have. You may find yourself pumping the ISO up to 1600 or higher in order to get enough shutter speed when shooting around sunset or sunrise. Be sure to use the fastest lens you have but be ready to drop your ISO if the animal stays stationary for a period of time and you think you can get away with a slower shutter speed. I have shot a rhino portrait as slow as 1/60 sec (with solid support on a beanbag) taking advantage of the fact that he was standing very still to allow me to drop the ISO back to more respectable levels.

Sitting in a pool of light in the morning this lion looks regal.

The beautiful golden tones of morning.
Rim-Lighting: Yet another reason to be looking for wildlife in the ‘golden hour’ is the possibility of creating images that have rim-lighting. Rim-lighting is one of the most lovely effects that you can achieve in wildlife photography. The effect works best with furry or feathery creatures and you need early morning or late afternoon sun directly behind the subject and at a very low angle. The light strikes the perimeter layer of fluffiness and lights it up in gold, beautifully outlining all or part of the animal.
It can be challenging getting good exposures in these conditions. Make sure the animal itself is not too underexposed so that you can keep detail in the shadow areas (or go for a very underexposed image that features the rim light as the only way the animal form is defined). Since you will be shooting in RAW you can recover some of the shadow detail from the animal itself when processing the image. You can also selectively boost the brightness of the rim-lighting and choose a warmish color balance.

The morning after for young lions captured with backlighting.
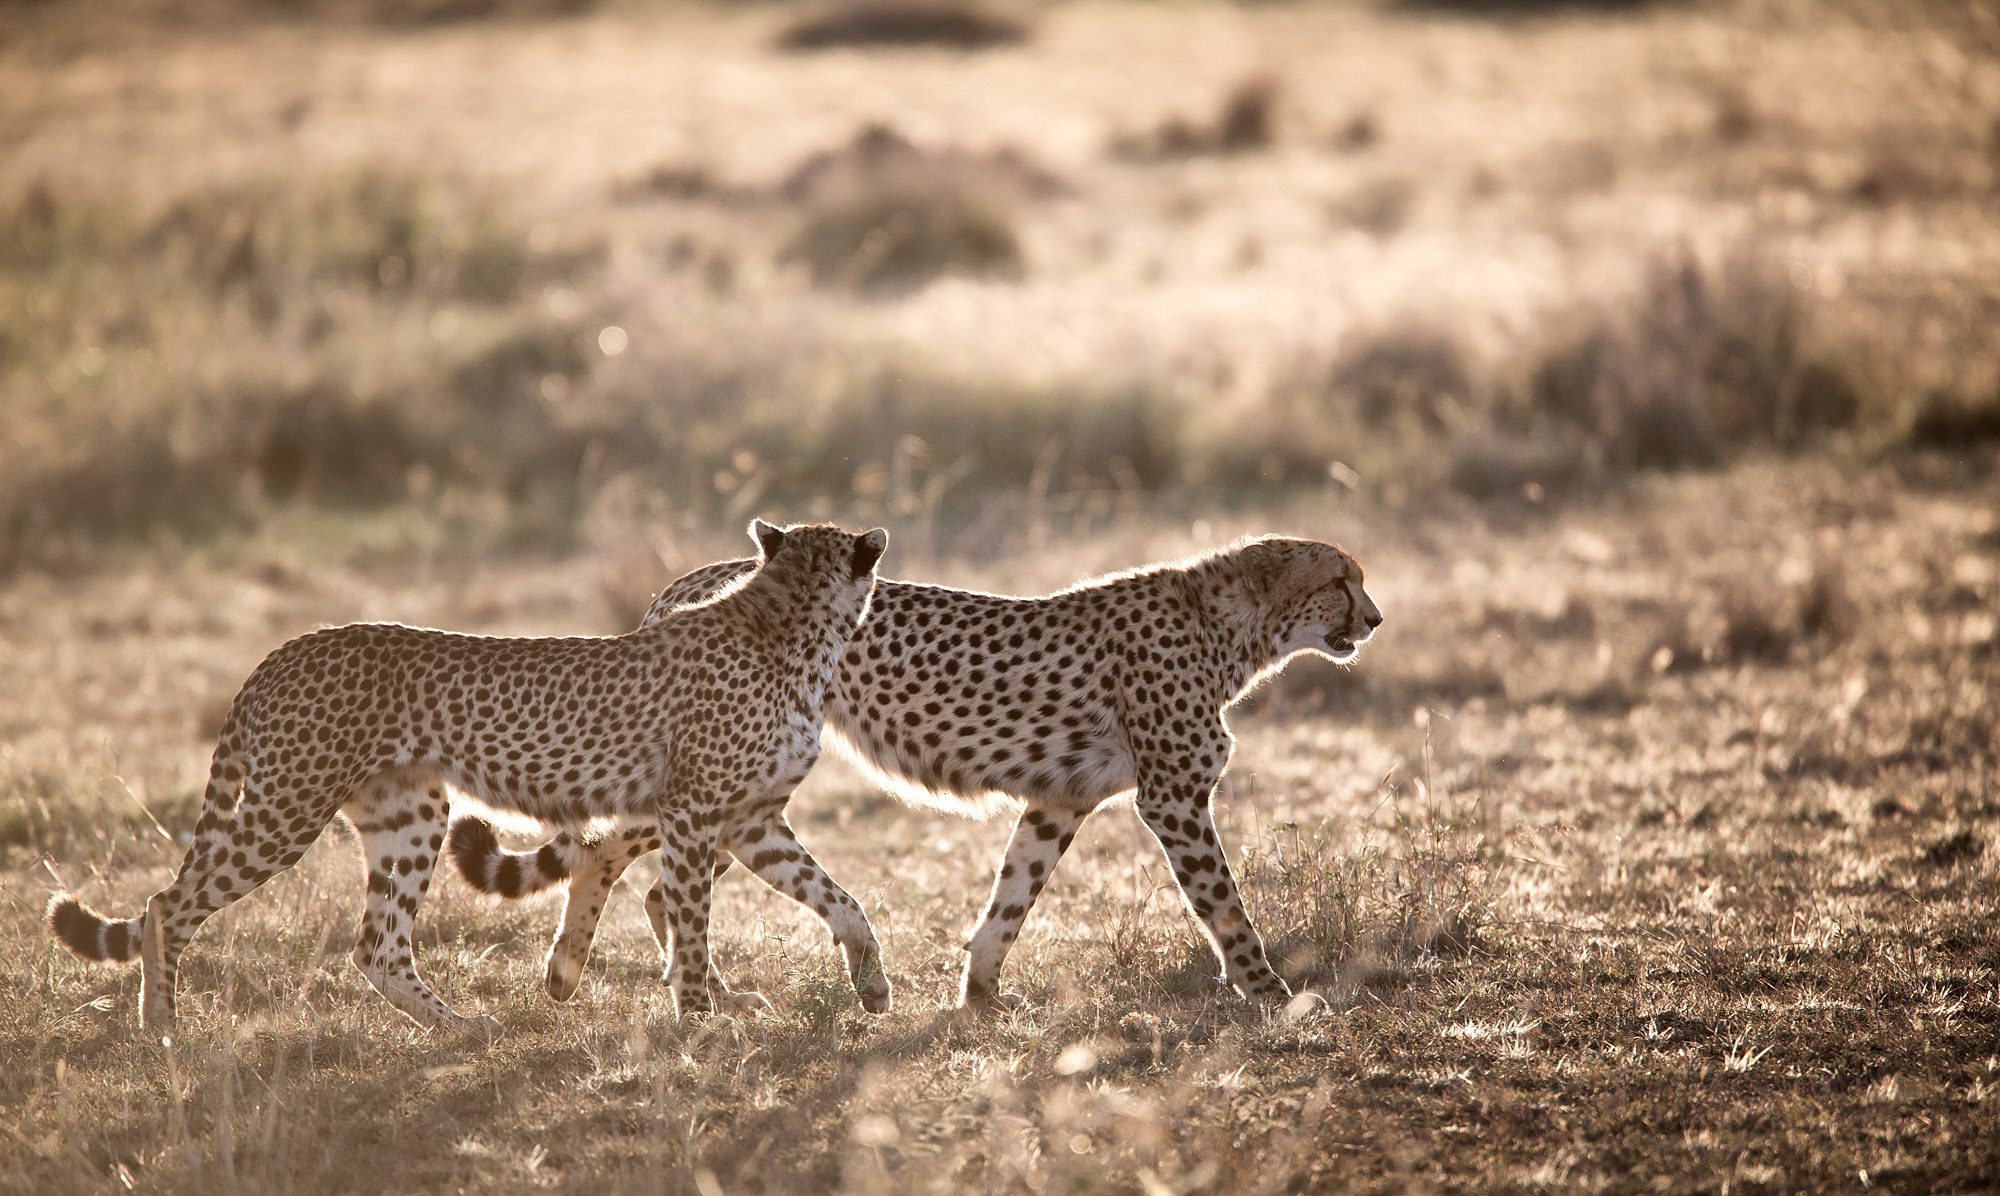
Prowling before the setting sun these cheetah are beautifully rim-lit.
Sunny Days: Regrettably we can’t have golden hour for the whole day. Unless you want to pack up and go back to the lodge for breakfast, you just have to deal with the light you have in front of you as the sun climbs higher over the morning. Even when conditions are bright with high contrast you can still get good results. Watch where the shadows are falling and wait for head positions that allow clear, unshaded views. Try and find uncluttered backgrounds that don’t show high contrast areas of shade and light , then throw it out of focus with good separation from your subject. The full sun, high contrast time of the day is less suited to the wider, landscape inclusive shots and more suited to going for portrait or detail shots.
Shooting at locations that are close to or on the equator (such as Kenya) where the sun gets very high very quickly, the shadows can almost disappear into the ground beneath the animal. With a nice soft, out of focus background without shadow casting foliage or features, you will have a good chance of making nice images. This elephant image from Kenya’s Masai Mara was shot mid-morning before the sun was at its highest but it was a clear sunny day. The background is distant and evenly lit, there are no obvious shadows in the background and the elephant head is well lit.

A mid-morning shot with strong light but still a very nice shot.

A shadow-less profile shot with the sun behind the camera.
Night Shooting: Many destinations that you will go to for wildlife photography will be in national parks that have a strict night-time curfew. If you are lucky enough to be heading to a location that is a private concession, find out if they offer nighttime game drives. You may have the chance to see and photograph some of the nocturnal animals that Africa has to offer. A popular subject is predators such as lions. You can get some quite interesting images by spotlighting but aside from the photography, just being able to see the animals at night is a privilege. Hopefully your guide will be well trained and will know which light sensitive diurnal animals to avoid shining the spotlight on to avoid harming their eyes or their night vision. Spotlighting doesn’t seem to bother predators and they generally will just ignore your presence.
The downside of using the spotlight (at least in terms of the photography) is the harsh shadows that are cast and the hard fall-off. Some experimentation on different light angles and placements will give you some options to choose from in the review process. Applying a heavy vignette is often a way to smooth out irregular shadows to the background.

Heavy vignetting helps smooth out shadows on this spotlit shot.

Lions are more active at night!
Creative Tactics
Shooting Bugs with a Gun It is not an uncommon occurrence to find yourself in the position of being loaded for lion with your 100-400mm lens but to your frustration there is not a lion (or any other large animal) in sight. What to do? Look for the smaller flora and fauna. For example, it’s possible to shoot lovely shots of large insects like dragonflies with a telephoto lens. They look lovely and they give you practice shooting and editing. If you have space, adding an extension tube to your kit will enable you to decrease your minimum focus distance and increase magnification.
Details of a Mopane leaf or a lily pad will add some context to your collection of shots. Lizards, small birds, snakes and flowers will all be fantastic subjects for your lens if you can find them. Indeed, they may end up being some of your most treasured images.

A bush cricket shot with a telephoto lens.

Dragonflies make great target practise.
Shoot Everything That Moves The old hands will leave their cameras on the seat beside them for most of the regular or common sightings. They’ve seen it all before. However, if this is your first (or second or third) safari then you need to get thousands of frames under your belt in order to be confident with your techniques and the cameras user interface. Only comparatively few of your total count will be ‘wall-hangers’ but you need that bulk of work to exercise your creative brain.
Many photographers will scoff at the ‘spray and pray’ method of photography and for most genres this is a valid tactic to criticize. Wildlife photography is a little different. Animals can move quickly and are constantly changing positions which means that backgrounds change just as quickly. You will be wanting to try different body positions and spotting various different compositions as the scene unfolds. Remember, unlike model photography, you can’t instruct your subject to strike the best pose! You may find that you eventually get the stunning shot you hoped for and will delete many of the prior shots but you won’t know that till you have finished – at least not until you are better practiced at anticipating the key moment. This is not to say that you should shoot a hundred photos of a sleeping crocodile of course.
Look Over Your Shoulder It is all too easy to get tunnel vision when you are standing behind a tripod with your lens trained on an amazing vista or an exciting animal. Stopping to assess your surroundings and looking behind you can pay off, sometimes in a big way. This mouse photo was taken while I was at the popular and productive Okaukuejo waterhole in Etosha National Park. There were elephants satiating their thirst at the waterhole but I was facing the other way taking photos of this mouse which was playing around on a nearby tree. It is one of my favorite pics from Etosha and I wouldn’t have seen it unless I was keeping an eye on my surroundings. On another occasion I was part of a photography group, again in Etosha, who were very excited about shooting a pride of lions that were about thirty meters away on one side of the vehicle. It was the guide who spotted the two lionesses that were almost within touching distance on the other side! Lesson learned.

A sneaky peak at Okaukuejo waterhole.

Birds make wonderful practice for learning your AF system.
Wildlife Panoramas Stitching a number of shots together in Lightroom or Photoshop is a common technique in landscape photography for getting that expansive panoramic look or getting a higher resolution image. Try it for wildlife photography too. It can give you a unique quasi-landscape image. I generally shoot these handheld or loosely shot on a tripod with plenty of overlap. Look for a straight line somewhere if possible to help you get a straight horizon and shoot plenty of pics with lots of overlap. Shoot the series several times to ensure you get one that works. It doesn’t necessarily matter if animals are moving, provided you get that movement contained within one of the frames.
With the zebra series below there was some movement among some zebra’s but I got a series to work quite well because most of them were still enough that Lightroom had enough info to build the panorama. If the animals are in little groups even better. You can isolate them within separate frames of the series and end up with a photo of a moment in time that never actually happened. There are even some animals that remain still enough that you can stitch photo’s together to complete the whole animal. The crocodile image shown was done with three images using a 500mm lens. It was my solution to not having a shorter focal length with me at the time which meant I could not fit the whole animal into a single frame. The photo-merge feature in Lightroom usually makes merging images together a breeze and allows RAW editing of the resulting merged file.

A three image stitch of a perfectly stationary animal.
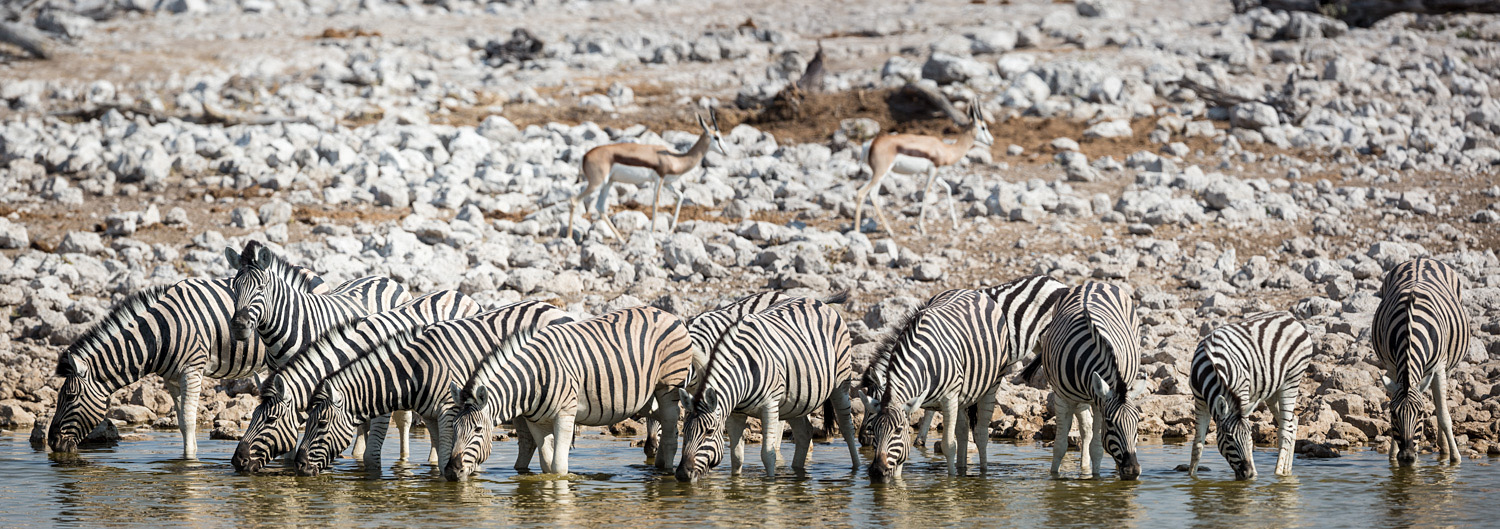
Zebra's in a line just waiting for the panoramic treament.
The Peak Moment Chimping’ (reviewing an image on your camera’s LCD) is a good way to weed out a few bad images to save space on your card or check your settings. Don’t get caught doing it when the action starts though! Try and be aware of, and even predictive of, what is happening. Learning some animal behavioral traits can help with this. The classic example of this is waiting for a bird on a branch to defecate, which is usually a sign that it is about to take flight – a great time for you mash the shutter button down at eight frames per second to try and get that killer bird takeoff shot. For another bird example, if you watch patiently, sometimes you will notice that a bird will come back to the same perch repeatedly. Don’t follow the bird with your lens, focus on the branch, lock your tripod off and follow the bird with your eyes so when it finally returns you are already firing off shots in the hope of getting a beautiful landing shot.
This giraffe shot was a result of anticipating some interaction before it happened. I had already taken some photos of the baby giraffe then saw an adult giraffe approaching. I stayed focused and framed on the baby while hoping and waiting for the mother’s head to enter the frame. My intuition paid off and she leaned down to give her baby a lick behind the ear. I have a whole series of shots from which I could easily select the one I thought captured the peak moment the best.
Have your camera settings dialed in for any situation before you get a chance of a shot. Focus on branches near where you expect the animal to be. Adjust your exposure compensation by doing test shots on areas of similar brightness and color. Watch your shutter speeds constantly - many an image has been ruined by not having the shutter speed high enough. It should be as easy as breathing to change your settings with the camera at your eye to keep that shutter speed up so that you are always ready.
Your tour leader and your local guides will be good sources of information to help predict what an animal will do next and how to help you get the shot of that.

A mothers love caught at peak moment.

Pre-focusing and aiming at the perch allowed this landing shot.
Animal Interactions Capturing animal interactions and behavior is gold for wildlife photography. It tells a story of the behavioral traits of an animal and often provides some action or adorable mother and child moments. It can also tell a harsh story of survival in the case of a burst of animal conflict or the hunter and hunted relationship.
Make The Most of What Presents Wildlife photography is a game of chance and you won’t always get the exciting action-filled sightings or the pre-visualized images you are after. Take everything in your stride and just enjoy whatever is in front of you. Keep an open mind and get the best images you can with whatever you have to work with. Sometimes the most satisfying and surprising images can spring from the most unexpected situations.
Work The Scene Animals will often stay in one spot for a while, allowing you some time to think about what you are doing and plan your shots. It is too easy to stay stuck where the driver stopped the vehicle and complain about a branch that is in the way or an untidy background. Keep yourself out of the animal’s circle of comfort, but work the angles by moving the vehicle (or yourself if you are on foot) to try and compose a better shot or get a better background. It is often surprising how different the shot will look if you move a few meters and try a different composition. If you can’t get a better view, just be patient and wait for the animal to change the angles for you. Animals will always move if you wait long enough.
Dashing from one sighting to another is not necessarily going to get you better photos. What will, is taking your time and ‘working the scene’ till you are satisfied that you have gotten the best shot you can from that particular situation and those particular conditions.
Dedicated photographers after a particular shot (like waiting for a hyena pup to emerge from a den) will wait for ages for that pre-visualized moment. This is not always viable when you have other people in the vehicle who are keen to move onto the next sighting, or the park sunset curfew is about to come into effect, but give it your best shot if it seems worth it. You will eventually get a feel for when the sighting is not worth hanging around for, then you can go looking for the next one.

Working the scene.

Working the scene - the final shot.
Africa Has Landscapes Too Though wildlife photography is probably your focus you might want to try a bit of landscape photography when you get the chance. Conventional landscape photography with tripods and forethought is not always easy as you will be vehicle based most of the time but opportunities may present nonetheless. You will usually be allowed out of the vehicle for sun-downers or meals in nice locations. At other times telephoto shots (especially at sunset) can produce pleasing images.

A mara icon captured at 500mm.

Morning light over Botswana.
Gear
Camera Bodies (Note: I will reference Canon equipment here since that is what I am most familiar with but Nikon has bodies and lenses that are more-or-less equivalent that will do just as well.) Although the 1-series canons like the 1DX and 1Dmkiv are considered the gold standard for action photography, I wouldn’t necessarily advise them. They are expensive, heavy and bulky and will just make your already bulging backpack even harder to handle. The Canon 7D and 5D camera series will do just fine in most circumstances. The 5D mkiii in particular is a great choice for most situations. It has a superb AF system and equally superb image quality. It is limited only by its ‘slow’ frame rate of six per second and a relatively small buffer. The 7D or 7D mkii are also great and are particularly well suited for shooting birds, fast paced action or close ups.
You don’t have to spend money on the ‘pro’ camera bodies though - the smaller ‘consumer’ grade DSLR’s like Canon’s 70D or 700D or similar will also do really well if budget is a concern. Probably the best value for money wildlife camera to purchase at the moment in the Canon range is the 7D mk2. Good secondhand camera’s that you can get on eBay include the 5D mkiii and the original 7D. The older 5D mkii is seriously lacking in the AF department and will frustrate at times but is still a capable camera overall and has great image quality.
Crop Factor Cameras that have an APS-C size sensor (such as Canon’s 7Dmk2) are said to have a ‘crop’ factor. In other words, because the sensor is smaller than a standard 35mm ‘full frame’ sensor it is recording a smaller portion of the image circle that the lens casts. It gives the appearance of magnifying the image by a factor of 1.6x, making a 400mm lens effectively a 640mm lens, a great advantage when shooting the more cost effective shorter focal length lenses in the 300-400 range.
The sensor size is not the whole story however. The advantage comes when the crop factor camera has a higher pixel density (smaller pixels) than the full frame camera you are comparing it to. In real terms a 20-megapixel Canon 7D mkii has smaller pixels than a 22-megapixel Canon 5D mkiii so it does have a significant advantage but it won’t have any advantage over a 50-megapixel Canon 5DS which has a similar pixel density. In other words, the 50mp Canon 5DS could have its image cropped to the same APS-C image size as the 7D mkii and achieve the same resolution, whereas a Canon 5D mkii’s image when cropped would result in an image that has less resolution and less detail than that of the 7Dmk2.

Wildlife shooters coming to Africa love their gear!


Buy A System not a Camera If you want to shoot wildlife, you will almost certainly get the best results with a Canon or Nikon DSLR system. When buying a camera you need to take the whole system into account not just the camera body. Pentax has decent and great value camera bodies but does not have the same variety of telephoto lenses as Canon or Nikon. Sony has some decent A-mount telephoto options and good DSLR bodies but for similar or higher prices than the more proven Canon or Nikon systems. As of the date of writing the multitude of mirrorless systems available are still not proven or universally regarded as suitable for the purposes of wildlife or sport photography, but they are catching up fast.
The Fuji x-system has some good cameras and a decent telephoto option but AF is not the fastest. The micro 4/3rd’s systems do have some telephoto options. The micro 4/3rd’s Panasonic and Olympus bodies are quite good but the sensors are much smaller and won’t have the same ‘full frame goodness’ and shallow depth of field that comes with a DSLR body and again, AF can’t quitematch a DSLR for the specialist purpose of wildlife photography. Sony mirrorless camera’s have very high quality imaging but for long telephoto options you would be limited to using an adaptor and a Canon lens which will result in reduced AF quality. A mirrorless camera system will of course offer significant weight advantages for travel and would be well suited to cultural or landscape photography.
It is viable to combine a DSLR system for your telephoto lenses with a smaller system for your landscapes or general purpose use. However, this carries with it the risk of having non-compatible systems that can’t be used to back each-other up in the event of breakage and I prefer to have a single fully compatible system for this reason.
It’s All About The Glass A ‘consumer’ body on a ‘pro’ lens will generally give you better results than a ‘pro’ body on a ‘consumer’ lens. Buy the best lenses you can reasonably afford to avoid the depreciation losses of upgrading and the disappointment of cheap build or unreliable AF. Canon and Nikon ‘pro’ grade telephoto lenses are of the highest quality and durability but they are expensive. Fortunately, third party manufactures like Sigma are now starting to produces some quite decent quality telephoto lenses that come close to OEM lenses in terms of performance and sharpness at least. Reliability and longevity can be an unknown quantity though.
The workhorse Canon lens for Africa for many years has been the Canon 100-400. The recently introduced mk2 version of this lens is a fantastic optic and even the old one is a fine lens if you get a good copy. This lens and focal range will serve well for many situations particularly for the larger and/or closer animals.
How ideal your lens will be is partially determined by where you will be going. Typically, National Parks will have strict rules and will not allow vehicles to leave the roads. Longer focal lengths like 500mm or longer will be an asset in this case. In private concessions the drivers will be able to follow animals off-road and closer distances will be more common allowing shorter focal lengths in many instances. Even then the longer focal lengths will be useful for smaller creatures or close-up animal portraiture.
My primary and most used wildlife lens for all my trips has been the Canon 500mm F4 L IS. It is an outstanding lens, albeit heavy, and I frequently use it with a 1.4x extender. I have tried various other lenses for my medium focal lengths - Canon 300mm F4 IS, Canon 70-200 F4 IS, Canon 100-400 4.5-5.6 IS. I would settle mostly for the light, convenient and high quality 70-200 F4 IS to save weight.

My favourite lens - Canon 500mm.
Know Your Camera Once you have your camera purchased get to know it inside and out. Build up your muscle memory for all the controls particularly for back button autofocus (discussed below). You need to be able to adjust ISO, aperture, exposure compensation, AF points all without taking your eye away from the viewfinder. Familiarity with all the menu settings will help you set it up correctly and make changes quickly.
Custom Setup Modes A powerful way of setting up your camera for quick and efficient usage is to pre-program three different setups into the custom modes of the camera. For example, I will generally have a setup for shooting moving animals that will have the ‘Av’ mode, AF setup for zone point selection, higher ISO for quicker shutter speed bias, wide open aperture, high speed frame rate and other settings that suit action situations. Save the setup to one of the three custom positions then create a new setup for slow moving or stationary animals with lower ISO, single point AF slower frame rate. With these setups not only can you change the entire camera set up with a flick of the dial you can always click out and back if you have changed your settings and want to go back to the default point quickly. A small tip for Canon users - turn off the auto sleep mode because when the camera goes to sleep it will wake up in the programmed custom setting, forgetting any changes you made while you were shooting previously.
Autofocus Doesn’t Belong On the Shutter Button! Focusing is critical to getting images that ‘pop’ so you need to master the focusing system of your chosen camera. Something that I consider essential to framing and capturing an image is using back button AF. To do this you train yourself to use your thumb to press the AF button on the back of the camera and remove the AF function from the shutter button. You will find this customization in the menu system. I personally have the shutter button linked with exposure lock and disconnected from AF for 100% of my photography whether it be wildlife or not as it is something you need muscle memory for.
Without using this camera customization, you will be forced to make sure your focus point is on your subject every time you depress the shutter button (or at least use the half depress, hold and reframe method) which can make for slow framing. It also means that you are more likely to miss focus if the AF point picks up something in the foreground or background, the next time you make a shot. If you use back button AF and you are shooting a subject that is stationary or moving parallel to the camera plane, you focus once with your thumb then take as many shots as you need without having to worry about the focus plane shifting by mistake and without any constraints on framing. Subject moving towards or away from you? Just select the right AF point or AF zone, hold your thumb on the AF button, follow the subject and fire at will.


Focus Setup Most cameras have three focus modes, single, continuous and a hybrid of the two. Use continuous focus along with the back button AF and ignore the other two settings.
A good focusing system in a ‘pro’ camera body will have a wide spread of focus points visible in the viewfinder and most of them will be ‘cross’ type (ie they will focus using both vertical and horizontal elements) for the best accuracy.
You will have the choice to use single point mode where the camera will use only one of the many points available, which you can manually select. This is extremely useful when you need to focus precisely on a small area. For example, you may need to avoid extraneous elements around the animal like vegetation or other body parts to ensure that the face is in focus. Or you may wish to focus on the eyes when you are shooting a close up. This option will work best for still or slowly moving subjects.
The second choice will be ‘zone’ focus which selects a group of nine or twelve focus points that again you can move around the viewfinder to the best location for your subject. This is an ideal setup for general shooting. The area of autofocus will be wide enough that you can ensure focus on moving subjects but not so wide that you are constantly focusing on adjacent unwanted objects.
The next major choice will be full auto which is all points active and allowing the camera to choose the focus point (or points) used. This will generally work by focusing with the center (or selected) AF point first, then once focus is achieved the camera will track the object using any number of points. This is the ideal setup to use when photographing something moving very fast like a bird in flight or something that is well clear of any elements that can confuse the AF system.
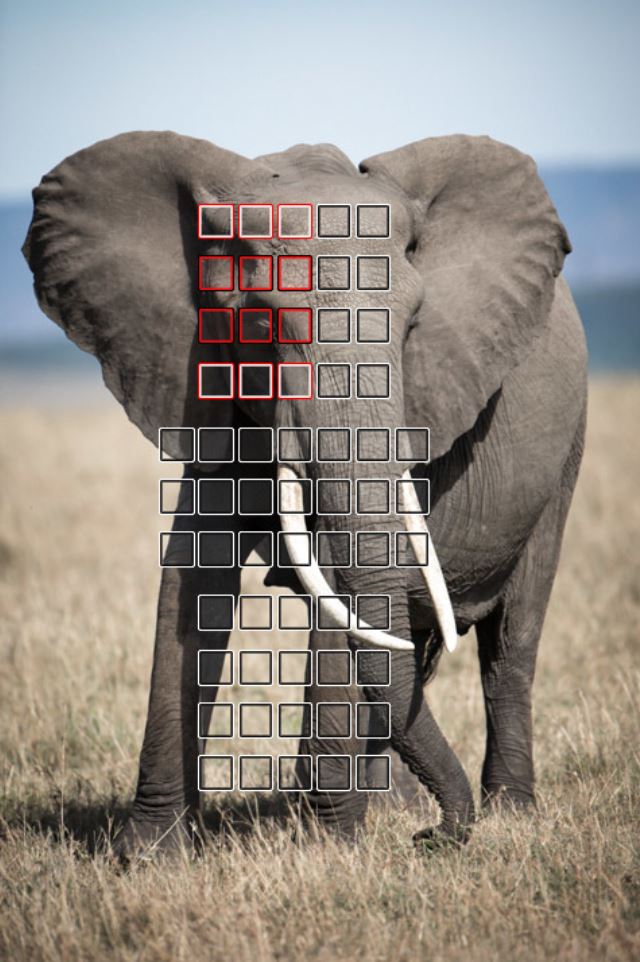
Zone focus placed over the hear works perfectly.

Spot focus placed on the most important part of the image.

Pro Photographers Don’t Always use ‘M’ Mode There is a perception that you should be progressing to a point where you use manual exposure mode. This is not true. Manual mode is great for landscape shooting where you have plenty of time, but for wildlife just stick with aperture priority. If you need to control exposure more in high contrast conditions, then having exposure lock linked to the shutter button (a custom function in the menu system) will allow you to keep the shutter button pressed halfway and shoot a whole series of shots at a constant exposure value.
There is even an argument to be made for using a camera in P mode (not the green full auto mode which won’t allow AF customization) and auto ISO, letting it choose everything. The algorithms that camera’s use are quite sophisticated and will get a good result most times. I still much prefer the control of Av mode but at the very least be prepared to click into P when you need to shoot suddenly and find your current settings are wrong.
Camera Support & Safari Vehicles The issue of camera support is important especially with large lenses and having to work largely inside a vehicle. The type of vehicle you will be working out of will depend on where you are going. In southern African locations (Botswana, Namibia, South Africa, Zambia, Zimbabwe) the prevailing vehicle type will be a custom built vehicle with an open style body that has no doors. It is enclosed by pipe framing and sometimes has a canvas covered roof. These vehicles allow more freedom of movement and better visibility but less opportunity for something to support your camera on. I find that using a beanbag to rest the camera on is not always practical if the bar-work is very low but it is worth taking one anyway. Another tactic I have used is to stand my tripod up against the bar-work in front of me (with the legs closed) and lash it in place with some strips of rubber tire tubing or duct tape. With a gimbal or video style head (not a ball head which allows lens flop) on the tripod you will have a stable platform for shooting certain angles at least, provided there is no one sitting in the seat in front of you. At other times handholding is the easiest solution and will likely be what you do the most. This gets tiring if you are using large 500 or 600mm lenses and it will take practice to maintain a steady shot but it is doable.
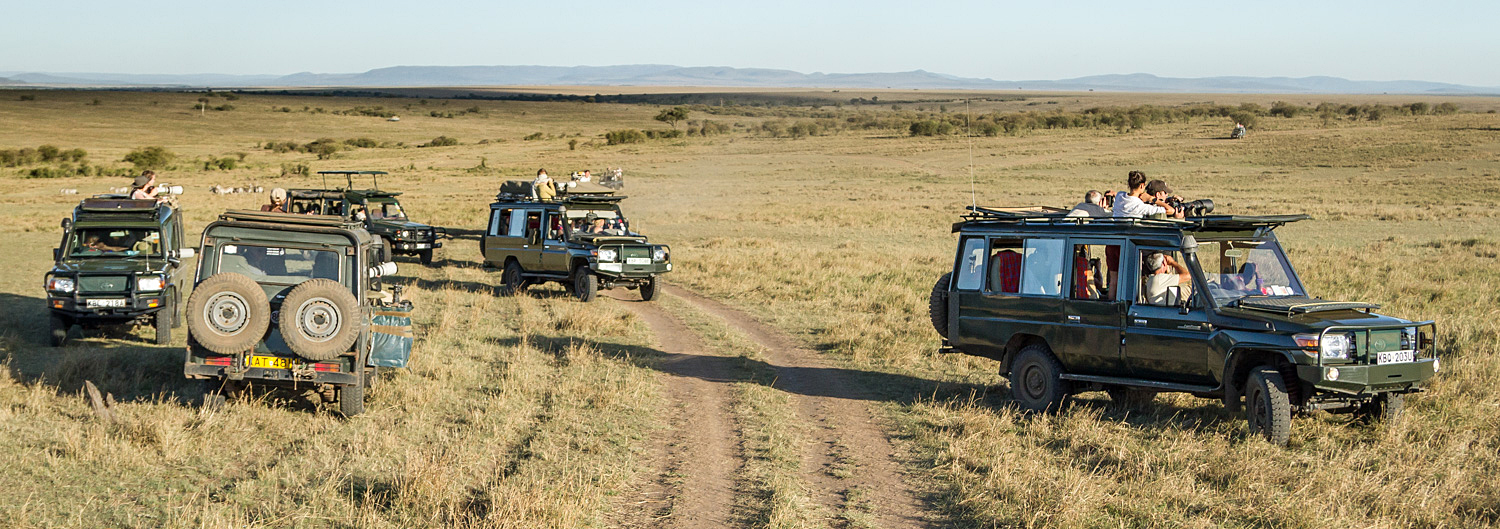
In eastern African destinations (Kenya, Tanzania, Rwanda, Uganda) the prevailing vehicle type will be full bodied Landcruisers or Landrovers with modifications that include a roof hatch. In this situation you will likely only need a beanbag for most of your support needs which you can rest on the open window sill or on the roof. Many vehicles will also have bar-work on the roof that you can use to fasten a Manfrotto Super Clamp 035 to. This clamp accepts a regular or gimbal style tripod head and gives you a solid shooting platform.
On a self-drive safari you’ll just be shooting out the window and again a beanbag will suffice but there are also various window/door mount support systems available.
Vehicles typical of east Africa.

Southern African vehicles.
Backup Equipment Another important consideration is gear backups. Needless to say the average safari lodge doesn’t have a camera store just around the corner, so one must consider the implications of the failure or breakage of at least your most important pieces of gear. Not only is it handy to have two camera bodies so that you won’t need to change lenses as often, the second body is a backup should the worst happen. Climbing in and out of vehicles, bouncing over rough tracks and panicked scrambling for gear in your pack in the thick of the action, all provides opportunities for breakages. You probably can’t take a backup for your main telephoto lens but you will at least have a shorter telephoto and lenses of other focal lengths - all of which will be useless without a body to attach to. Take plenty of batteries and a spare battery charger.
Image Security If you treat your images as though they don’t really exist in the real world till you have made two extra copies of them in separate locations then you will have a chance of getting home with those precious and expensive pixels. There are a few different ways of doing this but my procedure is as follows: a) I take enough memory cards so that I don’t have to delete any images from them. Lightroom recognizes previously downloaded images and won’t download them twice. b) I download images to an external shock and waterproof external HDD connected to my laptop - the same drive where my Lightroom catalogue is. c) I rate images and select images for deletion in Lightroom as I go but I don’t actually delete anything. If you do, then Lightroom will think they haven’t been downloaded and will download them again next time you put that card in again. d) I run a backup program to back up the downloaded images and my Lightroom catalogue to either a second external HDD or the laptop HDD. I now have 3 copies of the RAW files and 2 copies of any processed TIFF files I may have played around with. e) To add an additional layer of paranoia I carry my primary HDD and filled memory cards around in my camera backpack everywhere I go and I don’t format any memory cards till after I get home and after I have double checked that every image was downloaded correctly and my images are backed up for a fourth time onto my home PC.
Image Processing
This is Not a Post-Processing eBook The finer details of post processing an image deserves an eBook of its own so I won’t go into too much detail here other than to touch on a few general and important points. I would recommend purchasing Adobe Lightroom if you haven’t already done so. It is great software for managing your library and key-wording and the RAW processing that can be done with it is so good that in many cases you won’t even need to use Photoshop. I personally do my global adjustments and RAW processing in Lightroom then export to a 16bit TIFF file before I do final local adjustments using Photoshop with Google NIK plug-ins as smart layers.
Shoot RAAAWWWR! By now you should be aware that your camera shoots both RAW and JPG formats. JPG’s are highly compressed files that have ‘baked-in’ adjustments to white balance, contrast, color profiles, sharpening and other settings that are a result of the camera’s smart, but ultimately generic, algorithms. The camera initially captures the sensor data (the RAW data) then applies these image adjustments according to the settings you may have selected in the menu system. Once these adjustments are made the camera compresses the information into a JPG file then discards the RAW data. This processing results in the discarding of a lot of valuable image information that the camera did not see fit to use.
RAW files are not conventional image files. They are sometimes referred to as digital negatives. They contain all the ‘raw’ data captured by the sensor plus a preview image for interpretation. This preview will appear on your camera’s LCD screen with processing applied as per your chosen settings (such as color balance and contrast) but these will not be permanently applied.
As photographers we need to take this RAW file and post process it in Adobe Lightroom or Adobe Camera Raw using our own (not the cameras) judgement on how it should look. We then keep that data by exporting it to an uncompressed, 16bit TIFF file which we can then use for further editing with adjustment layers in Photoshop. Having the RAW files becomes even more important when the image is taken in challenging conditions that require recovering highlight or shadow detail. RAW files will retain a lot of dynamic range that can be recovered with Lightroom processing.
Try Monochrome If an image has nice texture, good contrast and punchy composition it might be a candidate for a black and white conversion. If the colors of the image are such that when converted, they all seem to average out to a mid-gray and there is little contrast then it probably is not a good candidate.
Monochrome images can often be processed in a more creative way using techniques like ‘dodge and burn’, applying a heavy vignette, low key or high key processing, or edge burning. My personal choice for editing images in monochrome is the powerful Silver Efex Pro 2 Photoshop plug-in from Googles NIK Collection.

Monochrome conversions work well on contrasty subjects.

Good muted saturation.

Overdone saturation.
Contrast and Sharpness Wildlife photography is a genre that rewards sharp, clear image capture as we like to see the detail on the animals face or body. The overall clarity and perceived sharpness of an image will be enhanced by making sure you have good contrast. Don’t be afraid of having some darker under exposed or shadow area’s along with some nice bright area’s. Use the structure and contrast sliders in Lightroom or Nik plug-ins (sparingly).
Don’t Oversaturate A common mistake made when processing images is to boost the saturation too much while post processing. I tend to increase saturation to key areas selectively then desaturate globally to achieve a nice natural, slightly muted, color palette. Over sharpened, oversaturated images look unnatural and amateurish.
Selection is Key Selecting the best images to process is important. You don’t want to waste hours processing a lot of images that may not be in your final folder of top pics. I find that it is best to put some time between your rating process and your final editing process. Looking at your images with fresh eyes after a hiatus of a few days or weeks will help you be more objective about your choices and more ruthless in your culling process.
Final Thoughts
Respect and Care About Your Subjects The worlds wildlife is under tremendous pressure from overpopulation, pollution, hunting and many other factors. Joining a wildlife photography tour, we are generally visiting a well-managed locally healthy ecosystem. This can leave us with the false impression about the general state of the environment. When you are in Kenya and are practically falling over lions on the Masai Mara it is easy to forget that lion numbers have plummeted from an estimated 400,000 in 1950 to less than 50,000 now. Our photographs and our tourist dollars helps these ecosystems get the attention and protection they deserve and makes them a valuable resource in their own right to the countries that own them.
These pockets of healthy ecosystems are getting smaller over time in most places in the world and Africa is no different. Population pressure and the need to lift millions of people out of poverty seem inevitably to tip the resource scales away from conservation and we all need to remind ourselves that we are each a small part of the problem and we can each be a small part of the solution.
Respect and Appreciate Your Local Guides Unless you are self-driving, you will be accompanied by and probably driven by local guides. These can be members of the local tribal group like you will encounter in the Masai Mara in Kenya or guides that work in the lodges on a fly-in fly-out basis such as you get in Botswana. They are for the most part fantastic sources of knowledge about the local environment and highly skilled at spotting or tracking the animals you wish to photograph. I have frequently been amazed at how my guides have managed to spot some fleeting glimpse in the bushes or the barely visible spots of a leopard. Some time spent with them explaining your needs as a photographer will help them serve you better. Be respectful and tip generously they deserve it!

A friendly guide in Kenya.

A buffalo checking out the guy checking him out.
Sometimes Just Watch We photographers are sometimes loath to put the camera down in case we miss an opportunity for a shot. You will add some further enjoyment to your experience if you take moments here and there to just watch the scene in front of you and remember it with your neurons rather than your pixels.